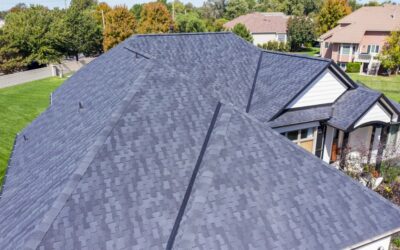
Sitting at the top of the roof, ridge cap shingles (often simply called “ridge caps”) are subject to the most wind exposure and the most direct impact from precipitation or blown debris. Loose, damaged, or missing ridge cap shingles can be responsible for highly damaging roof leaks, as water entry at the ridge can allow water to flow down the entire height of the roof structure. In our experience, ‘major’ roof leaks with flowing water tend to cause less damage in the long run, since they are noticed and repaired quickly. Minor water intrusion may not be evident from inside the building for a while and can facilitate mold and wood rot over time which require more intense remediation.
This article covers both standard ridge caps and ridge caps that are part of a ridge vent system. Ridge vents cover a ventilation gap – a linear slot cut through the roof deckComponents - A roof deck is the structural surface connected to a building’s framing that supports the roof system installed above it. More at the peak of the ridge into the attic, which allows hot air to rise from the attic and be drawn away by the wind. For more detail on the two most common exhaust ventilation systems used in roofs today, or to help identify which system you have, see Ridge Vents vs Box Vents.
We will discuss the types of ridge caps, how ridge cap shingles are installed, how to inspect them for damage, and repair/ replacement methods depending on the roof material.

Cracking and Splitting on Ridge Caps

A Ridge Vent with Low-Profile Ridge Cap
Types of Ridge Caps
On asphalt shingle roofs, there are two main types of ridge caps: manufactured ridge caps, and ridge caps fashioned out of standard field shingles (normal flat shingles). Most shingle manufacturers and quality roofing contractors recommend using manufactured ridge cap, as bending normal flat shingles can crack the asphalt mat and shorten the life of the ridge. However, cutting and bending field shingles was the standard practice for years until the 1990s/2000s, and is still commonly seen today. Sometimes it is the only way to get color-matched ridge. However, most architectural shingles (rather than older-style 3-tab) don’t bend enough for use as ridge, so the manufacturers make their own special ridge cap shingles ordered with the rest of the materials for a job. Use of ridge vent typically requires a manufactured ridge cap in order to cover the larger area
A brief note on decorative caps. High-profile hip and ridge cap shingles mimic the traditional look of historic wood shake roofs, accenting the lines made where roof facets meet. While usually an aesthetic decision only, some manufacturers use the larger size and thickness of decorative cap shingles to offer increased wind ratings and impact durability. High-profile hip and ridge cap are always a manufactured product (rather than made onsite out of existing shingles) and cost a premium. You can read more in our detailed article on High-Profile Hip and Ridge Cap Shingles.
While asphalt shingle roofs are by far the most common residential roof found across the US, any sloped roof with a ridge needs some type of protection for the roof peak. Metal roofs typically have a manufactured ridge compatible with the primary face materials, made by the same company. Tile roofs have special ridge cap tiles that fit the form of the adjacent slopes. Shake and slate roofs either use special caps or adapt field materials, depending on the type and product manufacturer. Synthetic/composite roofs (i.e. synthetic shake) always use a manufactured ridge cap designed to fit the adjacent slopes. Occasionally, we also see decorative metal ridge caps, such as copper fittings, which are custom fabricated to fit the roof, often with finials.

This Brava Synthetic Tile Roof Features Matching Hip and Ridge Tile

Older Style 3-tab Shingles Are Not As Common Anymore, But Are Still Manufactured. The Ridge Cap Here is Made Onsite, Cut From Regular Field Shingles

A Shingle-over Style Ridge Vent with High Profile Ridge Cap

This Un-vented Ridge Features High Profile Ridge Cap to Mimic the Look of Traditional Shake Roofs and Accent the Ridge Lines
How Are Ridge Caps Installed?
On a new build or complete roof replacement, ridge cap shingles are overlapped like a regular shingle, so that each successive course covers the nails holding the previous course – except overlapping horizontally instead of up the slope of the roof as they are in the field. The term “field shingle” refers to all standard shingles used “in the field” of the roof, meaning they don’t need to do anything but lie flat.
Ridge cap shingles are usually oriented to face away from the prevailing wind in the region. For example, if the ridge points east/west, and the prevailing winds usually come from the west, a professional will start on the eastern end of the ridge, working backward. This technique reduces the potential for wind upliftPerformance - Wind uplift is the upward force exerted on a roof system when wind over a building creates suction and pulls against the roof assembly. More because the leading edge of each cap is tucked neatly under the one before it. Since the last ridge cap won’t be covered with another, the two roofing nails are sealed over with roof sealant to help protect them.

An Exposed Ridge Vent During Construction, Before Ridge Caps Are Installed Over

This Shows the Three Phases of a Ridge Install with Ridge Vent: Open Channel, Vent System, and With Final Ridge Cap. Shown Here in DaVinci Synthetic Slate, the Process Is The Same For Asphalt and Synthetic Roofing Materials.
Hazards & Safety When Inspecting or Repairing Roof Components
Replacing a ridge cap shingle is not especially complex, but standing on the roof might be a challenge. You’ll need to get yourself, your tools, and the materials to the highest point on the roof. If this task seems unusually dangerous or difficult with the gear and help you have, calling in a pro is recommended.
Wear shoes with soft soles and good traction. We highly recommend wearing an arresting harness anytime you are working on the roof: For most people, a pitch of 4:12 or steeper is roughly the point at which walking becomes challenging and navigating on all fours is required.
Briefly asses the condition of the roof. Do not go on a roof in the rain- it can wait. Are there suspected soft areas that might collapse under your step? Is the roof covered in something slick, such as moss, mold, or droppings?
When working on a ridge, it’s often safest to straddle the ridge while working. You can work from the side of the ridge if needed, but always face the ridge. In general, always stay facing uphill/toward the ridge when navigating on a roof, or sideways, but not downhill. It is safer to walk backward when walking towards the lower edge. If you should stumble you want to fall up, not down. Note that tools and materials will affect your balance.
What Tools Do I Need to Replace a Damaged Ridge Cap Shingle?
You will only need a few hand tools to replace a ridge cap shingle. Here’s a basic list. Please note that manufactured ridge cap shingles are usually sold in boxes, not bundles, like regular shingles. This is because ridge cap shingles may be pre-bent to the roof pitch, or scored for easy bending over the ridge vent. They will have the same name, like “Desert Tan” or “Charcoal Gray”, as the shingles they are made to pair with.
● Flat Bar/Pry Bar/ Cat’s Paw
These prying tools are for removing the remains of the shingle, and any loose roofing tacks.
● Hammer
The ridge cap shingle will have been attached using two roofing nails, so you’ll need to drive new ones in.
● Caulk Gun and Sealant
If you can carefully remove the ridge caps to either side of the missing one you can reuse them. Avoid pulling the roofing tack through the shingle, as the shingle will need to be replaced.
Once the new ridge cap is in, place a bead of sealant between the underside of the preceding ridge cap and the top of the new one. Then, place sealant between the underside of the new cap and the top of the subsequent one. This will help keep the new ridge cap in place until the roof warms up and softens the adhesive on the ridge cap.
Do I Replace the Ridge Vent When I Replace a Ridge Cap Shingle?
If you’re having to replace a loose or missing ridge cap shingle the chances are good that the vent itself has also sustained damage. Depending on which type of ridge vent you have, the inspection will be different, so we’ll discuss each type of ridge vent material:
Aluminum Ridge Vents
Aluminum ridge vents don’t receive ridge cap shingles, but you may find yourself replacing one. Aluminum ridge vents are made from sheet aluminum, formed into a channel. This channel was nailed over the vent opening in the roof, and the included slots in the metal provide the circulation.
However, aluminum vents were open on both ends so manufacturers developed rubber stoppers (like a bottle stopper) to close in these openings. The idea was sound but the rubber stoppers never lasted as long as the aluminum, so the result was often a bird’s nest in the hole.
These vents are also limited in length, so there was usually a seam somewhere that formed a leak. They were also easily dented, so a small tree branch could render one useless. Over time these rigid aluminum vents have been largely replaced with shingle over vent materials, which are more durable, look better, and can be reused.
Shingle Over Ridge Vents
Shingle over ridge vents are typically made from water resistant materials like fiberglass reinforced polymers (FRP), or some form of corrugated polyvinyl chloride (PVC) material. FRP vents often resemble a scrubber pad, while a PVC vent often looks like plastic cardboard.
Both are superior to rigid aluminum ridge vents owing to fewer joints, resistant to crushing, and elimination of a rubber plug that can dry rot. Even if the material is partially crushed, the remaining channels allow air to keep flowing.
Ridge Cap Shingles with a Built-In Ridge Vent – If you search online for roofing materials you may encounter ridge vent shingles that claim to have a built-in ridge vent. This term is misleading because these are actually shingle over ridge vents. Some designs work as a system, where a rubber or plastic vent is designed to accept a particular shingle for aesthetic purposes. Most come on a roll, which is unfurled over the roof opening. Then the pre-cut ridge cap shingle is installed over the vent, disguising its presence.
Other roof types, such as those using metal panels instead of shingles, do often incorporate the ridge vent into the ridge vent cap. However, these are not flexible ridge caps, but rather rigid sections often 12’ to 16’ long. Roofs that use shingles can use this type of ridge vent cap, but it stands out because the ridge cap material doesn’t match the shingles in texture or color.
What Are the Steps For Replacing a Loose Or Missing Ridge Cap Shingle?
Often, getting to a ridge cap shingle repair takes longer than repairing it.
Step 1) Remove the Loose or Missing Ridge Cap Shingle
It is important to completely remove the old broken ridge cap, along with any errant nails. This will keep the new ridge cap from lying flat against the other ridge caps, creating a potential leak. Use the flat bar and hammer to remove the ridge cap.
If you accidentally tear the underlayment you can use staples or plastic-cap nails to repair it. If you prefer, you can cut a new section of underlayment and cover the tear. Just remember to overlap the course below.
Step 2) Collect the Debris
Before you begin moving around to work it’s important to collect the debris from the old ridge cap. This debris will be like a marble if it begins to roll down the roof. If you step on the debris, especially if the roof is damp, your feet can lose contact with the roof and cause a fall.
Step 3) Repair Or Replace the Ridge Vent as Needed
If the ridge vent is found to be in good condition you can just seal over the old roofing tack holes and reuse the vent. If the vent is significantly damaged by a dent, tear, or hole it is best to replace that section of the vent before reinstalling the ridge vent shingles.
Replacing the section is relatively easy with a sharp utility blade or shears. You don’t have to concern yourself with finding a rafter to nail the vent to. Just nail the vent to the roof sheathing, which is usually OSB, or plywood.
Step 4) Replace the Ridge Vent Shingle(s)
To replace a ridge vent shingle, use a measuring tape and measure the overlap of the other ridge caps. On a standard shingle this overlap is about 5” to 5 ½” but follow the directions on the bundle.
This adhesive is heat activated, so it seals when the UV energy from the sun is absorbed by the shingle. If you are doing the work in cold weather, understand that this adhesive won’t soften until the ambient air and surface temperature increases. Check the operating range on the bundle if you aren’t sure if it’s warm enough to work. In general, it has to be above 40 degrees to work with asphalt shingles, but if you are working in winter, check out our Winter Roofing Guide (Lower Midwest)
Step 5) Apply Sealant
The fasteners are normally covered by the next ridge cap, so if your repair is not on an end of the ridge, make sure one edge goes under the preceding ridge cap, and covers the roofing tacks of the subsequent one.
As mentioned earlier, place a bead of sealant between the new ridge cap and the existing ones, especially if working in cold weather. This will protect the vent and attic until the sun warms up the ridge caps enough to activate the adhesive.
Stay Within Your Comfort
Roofing is not an everyday task. If you aren’t comfortable accessing or repairing a ridge yourself, talk with a reputable local roofing contractor. If you’re looking for help in the Wichita Kansas region, Rhoden Roofing offers free inspections.