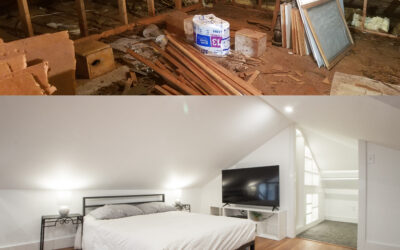
What is Headwall Flashing and What Does It Do?
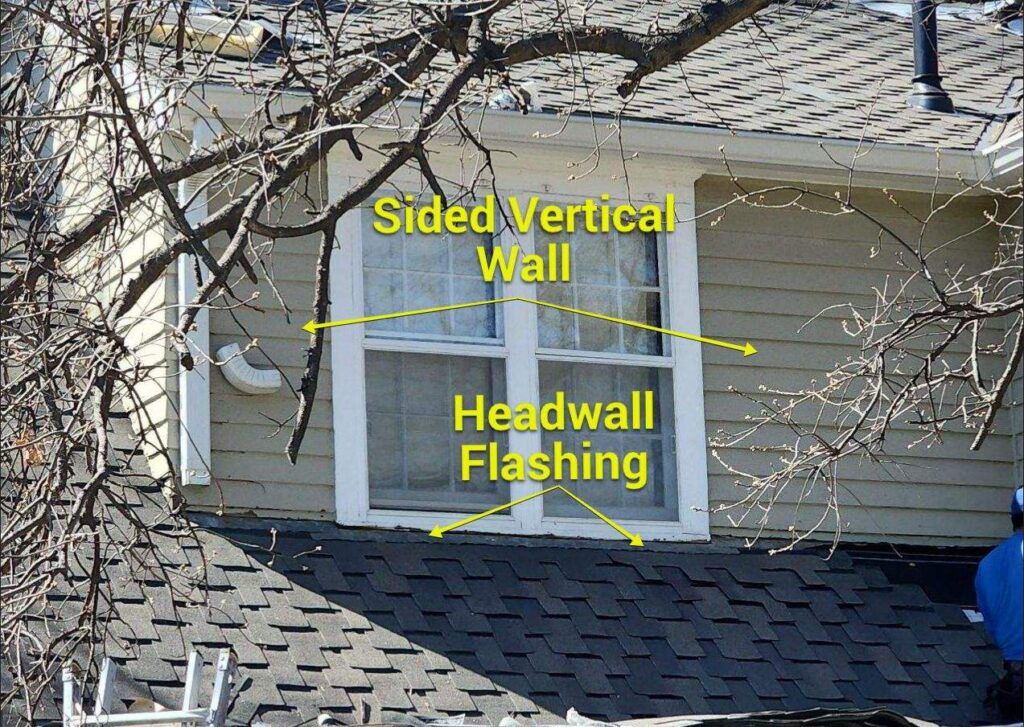
Headwall flashing is a metal piece that’s installed where a sloped roof meets a vertical wall, like where a dormer intersects with the roofline down slope. It directs water away from that roof-to-wall transition, preventing it from flowing behind the siding or under the shingles. All transitions on sloped roofs have flashing. Headwall flashing is installed to overlap the shingles below and tuck behind the siding above.
While we use headwall flashing to refer specifically to the flashing at the upper end of a roof’s intersection with a vertical wall, many roofing sources include it under the broader category of base flashing. For our purposes, base and apron flashing are synonymous, and refer to flashing typically installed on the downslope side of a penetration, like a chimney. Headwall flashing exclusively refers to flashing installed where a vertical wall meets the roofline, like a dormer or garage tie-in. A beauty bar, which is referenced throughout this page, is a course of shingles installed over the visible lower portion of headwall flashing to hide the metal, providing continuity with the field shingles.
Some design considerations necessitate the use of counterflashing over the vertical leg of headwall flashing. The most common instances of this overlap are when the vertical wall 1) is mortared (e.g., stone or brick), 2) transitions to a low-slope roofRoof Types - Low-slope roofs (flat roofs) are a type of roof system with less than a 3:12 pitch, most commonly found on commercial and industrial buildings. More section, and 3) has cladding that does not cover the headwall flashing’s vertical leg. All three situations require additional protection for the vertical portion of the headwall, which counterflashing provides. If your headwall has both headwall and counterflashing, consult our counterflashing inspection and service life evaluation article in addition to this article.
Expected Service Life of Headwall Flashing
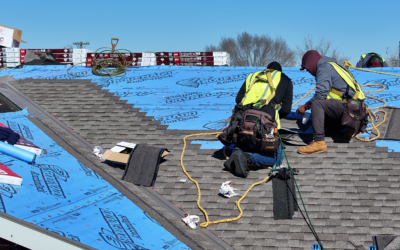
While manufacturing material and quality certainly vary, most headwall flashings are made with the expectation that they can last the lifespan of the primary field shingle of the roof itself (asphalt shingles). That is to say, 20-30 years is reasonably common. However, this is based on the assumption that the headwall flashing was replaced at the same time as the rest of the roof, which is not always the case. Owing to the need to manipulate siding or integrate step flashings, headwall flashings are time-consuming to replace, and one of the most common items left as-is when discount roofers are trying to save costs on a job.
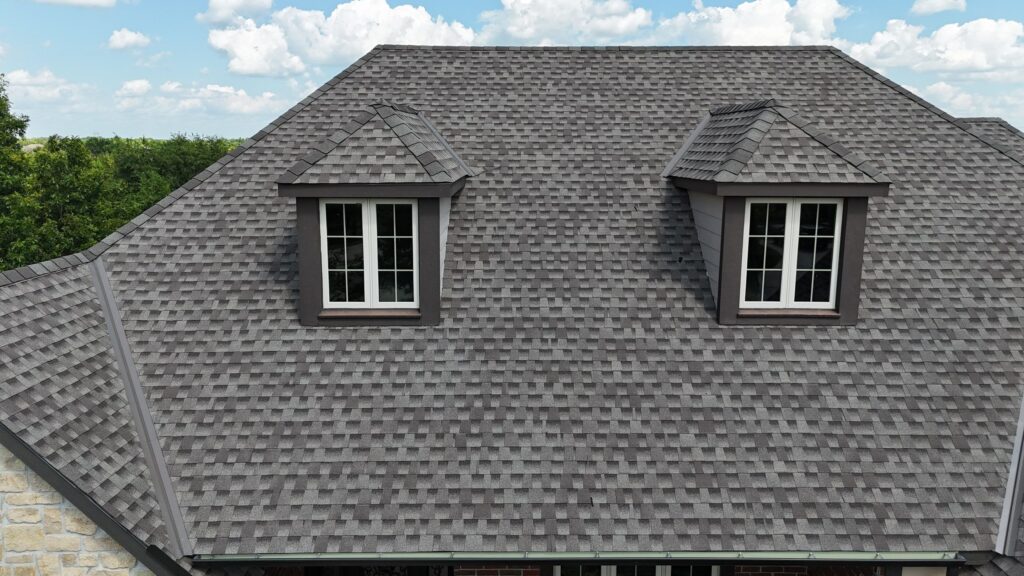
The most common roof-to-wall transition on pitched residential roofs is dormers. Dormers require step flashing along the side (often called “sidewall flashing”) and headwall flashing on the downslope side. We used beauty bars to conceal the headwall flashing, which maintains a non-disruptive, continuous appearance with the field shingles.
0-5 Years: New Installation – Evaluating for Correct Installation
Similar to step flashings, headwall flashing integrates with both the vertical wall and the shingles below it. It’s also usually either aluminum or steel. You can find out by using a magnet to see if the material is ferrous – magnets stick to steel, but not aluminum. Metals are often anodized or power-coated to match the desired look with the rest of the roof, but can also be painted on-site. On-site paint doesn’t tend to hold up as well, or could be a sign of re-used flashings that are older than the rest of the roofing materials. Some common errors we see with headwall flashing installations that you can look for are:
New, properly installed headwall flashing sits flush to the roofline, with or without a beauty bar (a course of shingles installed over exposed headwall flashing), which can be added to hide the flashing, blending it with the roofline.
- Headwall flashing installed under the field course of shingles. Headwall flashing should be installed over the course of field shingles nearest the vertical wall. This waterproofs the area where runoff meets the wall, directing water onto the roof surface rather than behind it. A beauty bar can be added to conceal the exposed metal. This allows the headwall flashing to properly overlap the field shingle course, which prevents water from being guided under the main shingle course. Headwall flashing with a beauty bar is obscured, blending naturally with the roofline.
- Reused flashings that are older than the roof. If you can see two sets of nail holes – former nail holes that have been sealed (hopefully) but no longer have nails in them, it is probably because the headwall flashing was pulled up and reused when the roof was last replaced. Another sign that you may have flashings that are older than the roof is if they have been painted after the fact, coating the older metal.
- Exposed nail heads or loose nails. Typically, all the nails on headwall flashings are covered: either by the siding (for the wall-side nails), or sealant (for the roof-side nails.) Along the horizontal run of headwall flashing, nails fasten through the shingles below, and each of those nail heads is sealed to prevent water infiltration. When a beauty bar is installed over the flashing, its fasteners also need a small bead of sealant where they penetrate the shingle. If those, or any other nail heads are exposed/loose, take a look at our article on How to Properly Caulk Exposed Nail Heads for info on material compatibility and best practices with roof sealant.
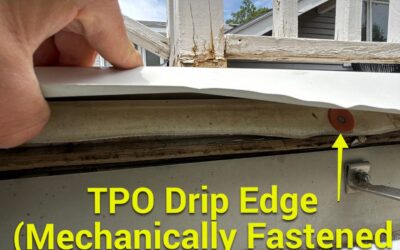
- Siding not cut away above headwall flashing. A minimum of a 1 1/2″ gap should exist between the bottom of the siding and the top of the roof surface. This is to prevent wicking of water into or behind the siding. If the siding touches the roof surface, it needs to be cut away higher to avoid wicking. Headwall flashing runs up and behind the siding, where the overlapping siding prevents water from running behind the flashing.
- Incorrect overlap with step flashing. Headwall flashing protects the downslope side of a vertical wall, while step flashing protects the adjoining sidewall. At the corner where they meet, the bottom piece of step flashing should overlap the end of the headwall flashing, similar to how shingles overlap each other. This guides water away from the vertical wall. Without that overlap, runoff will pool beside the headwall flashing on the shingle instead of draining away.

This headwall flashing has visible holes on its vertical leg, which suggests that the flashing was reused during the previous roof replacement. The shingles covering its horizontal leg are standard field shingles rather than a beauty bar, meaning the flashing was installed incorrectly and required replacement with a proper beauty bar.

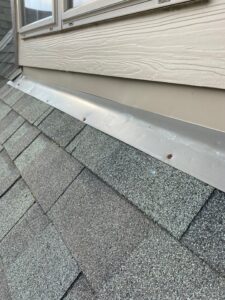
Aside from the backed-out fastener near the center of the photo, this headwall flashing is in good condition. The loose fastener has allowed the metal to lift slightly, but the metal flashing isn’t creased or warped. The vertical leg, which extends behind the siding, has been painted red to blend with the exterior.
5-25 Years: Normal Weathering – What to Monitor
With prolonged exposure to the sun/UV radiation, signs of age will show up on the metal headwall flashings. Headwall flashing is typically protected by either counterflashing, or siding. When it is directly exposed to the elements, it weathers like any other metal. Each headwall flashing metal weathers differently. The typical signs of aging for headwall flashings are:
- Deteriorated sealant: If a beauty bar was used, UV exposure can harden or crack the sealant used to protect the nail heads, leaving small entry points for water.
- Minor rippling: Surface rippling is generally cosmetic as long as it doesn’t 1) prevent the headwall flashing from sitting flush against the roof surface, 2) distort the vertical portion so that it pulls away from or exposes gaps behind the siding, or 3) create low spots where water can pool.
Aluminum Headwall Flashing
- Develops mild surface cracking on powder-coated color finish.
- Texture may lighten as coating wears.
- Coated aluminum fades over time.
- More susceptible to cosmetic marring (e.g., dents and mild wrinkling) from storms or foot traffic.
Steel Headwall Flashing
- Heavier and more rigid, so they retain their shape better.
- More prone to oxidation and rust if the coating is abrased.
Galvanized Headwall Flashing
- May begin showing white mineral staining as the zing coating wears off.
- Can develop darker staining where scratched by branches or other wear.
Maintenance: Sealant reapplication and light cleaning. For the most part, if this describes your headwall flashing, you’re still very much in good shape. A reapplication of compatible sealant can be applied proactively, and you can clean dirt and plant debris off the metal surface.
20-40 Years: Failure & Replacement – Knowing When It’s Time
The functional life cycle of a roof component is determined by its ability to keep water out. The transition from normal aging to concerning wear isn’t always clear. To clarify what these thresholds are, we created an inspection checklist to standardize our recommendations, ensuring that suggested only when it’s necessary. Similar to how an insurance adjuster defines “totaled” on a car, we only recommend component replacement when the cost to replace a component or roof is less than the potential cost of damages over the next 12 months.
Unfortunately, as headwall flashings are integrated into the layers of roofing and siding, they are difficult to replace. Headwall flashing is often a single piece. If that piece is warped or damaged, it needs replaced, which can displace a lot of other roofing material. Therefore, we are very cautious about prescribing headwall flashing replacement. Based on our experience identifying and fixing roof leaks on over 13,000 homes and buildings, here are our criteria for when we recommend replacement of headwall flashing:
- Corroded metal deterioration with active pitting rust.
- Abrasive damage more than half the thickness of the material – such as from a branch falling or maintenance error.
- Water intrusion – If any amount of moisture is weeping through the barrier along the pipe and into the building, the pipe boot needs to be replaced. Signs of water inside will be visible as discoloration to surrounding wood or insulation, grime lines or staining on the pipe itself within the attic, mold, or spots on drywall below.
- Severely warped headwall flashing. When headwall flashing is visibly warped or bent, preventing it from laying flat with the roof, runoff and wind-driven rain can get under the warped area. Metal weakens when it’s flexed, similar to a folded piece of paper. Even if the flashing is pushed flat, the bend leaves a crease that prevents it from sitting taut to the roof or wall.