If a piece of equipment works well without penetrating the roof, the safer option is almost always to keep it off the roof. Roof-mounted communication hardware is a good example of this:
The dish or antenna itself isn’t the risk – the holes drilled through the roof are.
Non-penetrating roof mounts exist for satellite dishes and antennas, but those are more common on low-slope roof systems. We typically see one of two mounts for roof-mounted communication hardware on steep slope systems.
- J-Mounts: A J-mount is a curved metal pole shaped like the letter “J” that’s fastened directly to the roof with a flat mounting plate. The vertical portion, the “J,” holds the dish or antenna above the roof surface, while the plate is secured through the
 shingles and decking with lag screws. J-mounts are the most common mounting method on residential roofs because they’re simple, compact, and afford flexibility with the hardware’s facing angle. However, they typically rely on six screws and a combination of sealant and caulk to stay watertight.
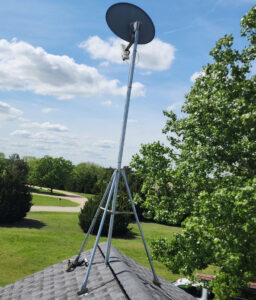
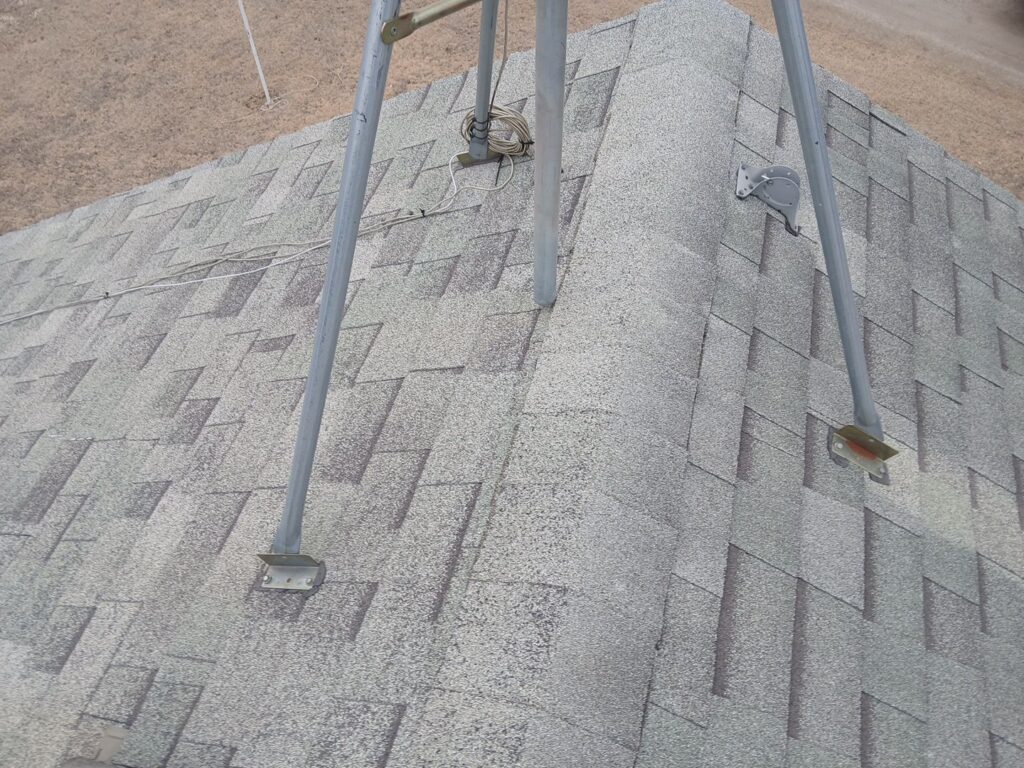
 - Tripod Mounts: A tripod mount uses three metal legs to support a vertical mast. Each leg is fastened to the roof separately, spreading the load across each plate rather than a single plate. Tripods are typically used for larger dishes or antennas that are mounted near the ridge. They provide better stability than J-Mounts while introducing more roof penetrations.
Note: If you have a mount on your roof with no hardware attached, we recommend waiting to remove it until the next time your roof is replaced. Removal involves the replacement of all materials beneath the mount, which is an invasive and unnecessary repair if your mount is in good condition.
Expected Service Life of Roof-Mounted Communication Hardware
A roof-mounted dish or antenna may last for decades. Its integration with the roof system rarely does.
The company that installs roof-mounted communication hardware and the company that repairs leaks around them often have different priorities. In most cases, the installer works for the dish company, whose priority is signal strength, and repairs are performed by a roofing contractor, whose priority is keeping water out.
From a roofing contractor’s perspective, every lag screw is a penetration, and every penetration is an access point for water. As a result, most reputable roofing contractors advise against installing communication hardware on the roof when a wall or fascia-mounted option is available.
We have reinstalled thousands of satellite dishes and have observed a few misconceptions about roof-mounted communication hardware.
Misconceptions About Roof-Mounted Equipment Installation
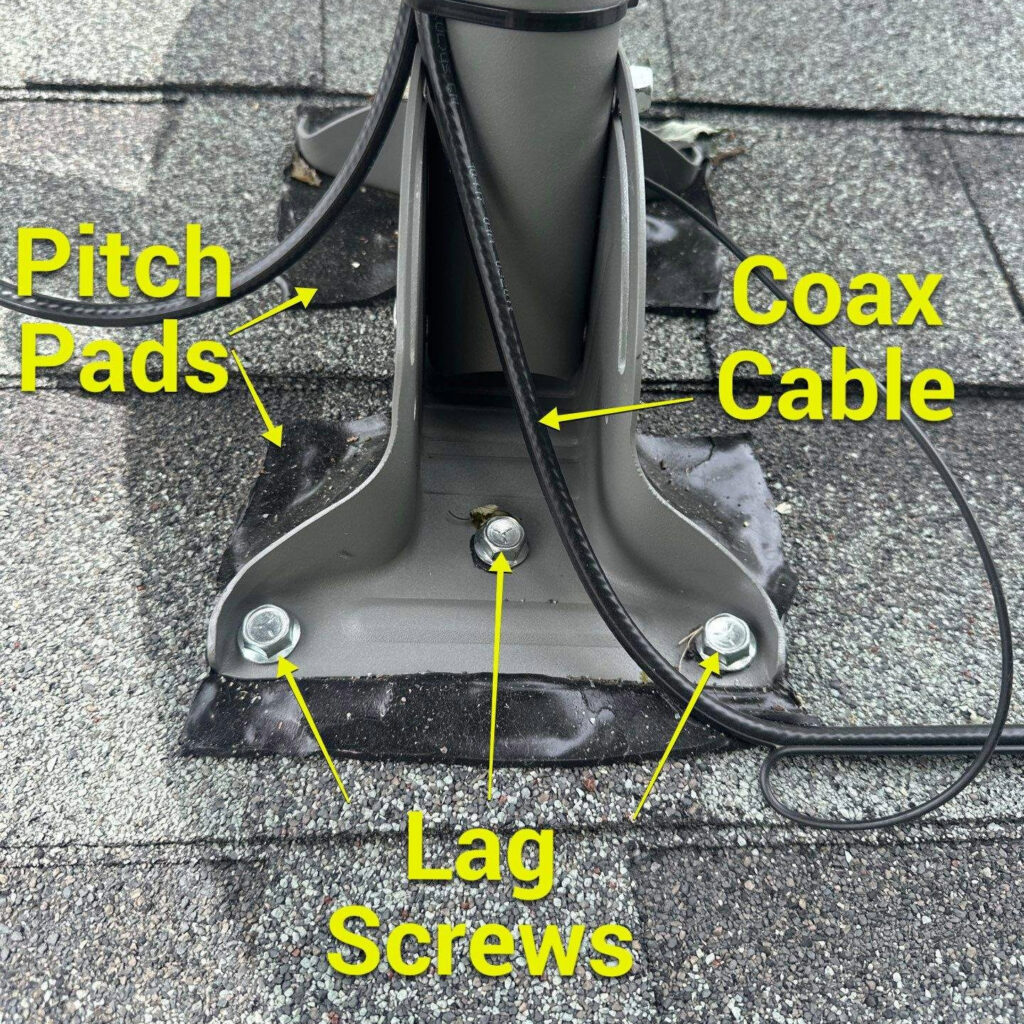
- All satellite dishes need to fasten into rafters: While a large roof-mounted antenna may require fastening through structural members, standard satellite dishes rarely do. We drill pilot holes through the sheathing and fill them with UV-resistant sealant and secure the mount with lag screws. Threaded lag screws “bite” into the decking which, combined with sealant, secure standard satellite dishes that can’t fasten through structural members.
- Mastic or pitch pads are required for installation: In most residential applications, pitch pads aren’t required. The footplate itself does not normally abrade shingles, and minor shingle compression over time does not affect its performance. Mastic or pitch pads aren’t used for base flashing on heater flues, chimneys, or skylights for the same reason. Any water resistance a pitch pad might provide is provided when the pilot holes are filled and the screw holes are filled with sealant and coated with caulk, making pitch pads unnecessary for most roof mount applications.
0-5 Years: New Installation – Evaluating for Correct Installation
At this point in the hardware’s lifespan, all issues are related to its installation. The hardware is new, but its waterproofing may be compromised if it was improperly installed.
- No sealant or incompatible sealant over fasteners. Each screw creates a direct pathway for water unless it’s sealed. Proper installation involves filling the pilot hole with sealant and protecting the exposed screw with caulk. If no sealant is visible on a recently installed mount, it was either never applied or an incompatible product was used and it has already failed.
- Heavy equipment mounted only to the roof deck. While standard satellite dishes can be securely mounted to the roof’s deck, heavy antennas or dishes should be anchored to structural members. Units mounted only to the roof deck are likely to move easily, resulting in backed out fasteners. If the dish mount feels “springy” or pliable when pushed and fasteners are backing out shortly after installation, it’s often because the hardware is too heavy to be secured exclusively to the deck – or because oversized pilot holes prevented the screw threads from “biting” into the structural member.
- Improper Placement. The best placement for a satellite dish is usually off the roof entirely, often mounted to the fascia or a wall. Fewer holes in the roof are always better. When roof mounting is unavoidable, it should be installed away from valleys and eaves where water is channeled or may back up during heavy rain or from ice dams. Installations a few inches inside the rake edges encounter less water runoff and are easier to repair, if issues occur.

Improper Placement: This satellite dish is mounted at the eave, where water is channeled and can back up during heavy rain or ice dams. While the dish itself may function normally, the location increases the risk of water intrusion if sealant fails. During this re-roof, we removed the satellite dish mount for the homeowner who no longer required a satellite dish.

Proper Placement: These satellite mounts near the rake show several aging issues, including dried asphalt mastic beneath the footplates and rusted fasteners. Removing mounts requires replacing surrounding shingles, underlayment, and the starter course. In most cases, unused mounts are best removed during a re-roof.
- Overreliance on Roof Tar. Sealant, caulk, and roof tar are redundancies. They should never be the primary method of keeping water out. Most roof mount installations we see feature an asphalt-based mastic pad or pitch pad beneath the mount. It can help cushion the hardware, but it is not designed to permanently keep water out. Water resistance occurs when pilot holes are sealed with compatible sealant.
- Missing Screws. Most satellite dish mounts have six screw holes. We often see one or two slots without screws, which affects the mount’s stability over time. The remaining screw holes will widen over time as wind and the mount’s weight cause the screws to move and “wiggle” in the hole, causing it to bore out the hole. If a mount has six screw holes, it should have six screws.
- Stapled Cables. Communication hardware uses coax cables that continue down the building’s envelope. The cables should be secured to the roof with clips that attach to shingles. Cables secured with staples or screws introduce unnecessary holes in the roof system.
5-15 Years: Normal Weathering – What to Monitor
As with most rooftop components, roof mounts don’t fail all at once. During inspection, the goal isn’t to judge the dish or antenna itself – we might not even look at it during an inspection. The goal is to evaluate how well the roof is sealed around it.
The mounts on this tripod-mounted satellite dish have dried sealant and mild surface rust. Neither of these issues suggest that this is a vulnerability — just that it is experiencing normal weathering. This roof also has consistent granule loss on the left slope, which suggests that the roof system is years into its expected service life.
- Drying Sealant or Caulk. The UV-resistant sealant or caulk protecting the fasteners may begin to dry and produce minor hairline cracks.
- Surface Discoloration. Subtle discoloration from UV exposure can appear on both the mount and caulk over the lag screw heads. This doesn’t typically affect its performance – it’s just a predictable sign of aging.
- Compression of Shingles Beneath the Footplate. Over time, the weight of the mount may create a slight depression in the shingles below. This is usually cosmetic, but it matters when the installer relied on roof tar or perimeter caulk as the primary seal: compression can create small gaps where water can sit and weep inward.
- Minor fastener movement. Thermal expansion can cause fasteners to back out slightly after a few years. This typically appears as screw heads sitting a bit higher than they did before, or a slight lift at the footplate edge.
Maintenance: Reseal and secure fasteners.
These are expected signs of aging that require minimal maintenance. Drying sealant with small hairline cracks may continue to perform for a few years, but it can be sealed at this point to preempt any future leaks. Any lifted fasteners can be resealed and refastened for the same reason.
15-25 Years: Failure & Replacement – Knowing When It’s Time
The functional life cycle of a roof component is determined by its ability to keep water out. The transition from normal aging to concerning wear isn’t always clear. To clarify what these thresholds are, we created an inspection checklist to standardize our recommendations, ensuring that suggested only when it’s necessary. Similar to how an insurance adjuster defines “totaled” on a car, we only recommend component replacement when the cost to replace a component or roof is less than the expected cost of damages over the next 12 months.
Replacing a roof mount for communication hardware can be a significant repair. Apart from the roof decking, every component it’s fastened to or through needs replaced, including shingles, ice and water shield, starter courses, and drip edge. Based on our experience identifying and fixing roof leaks on over 13,000 homes and buildings, here are our criteria for when we recommend replacement of roof mounts for communication hardware:
- Loose mount that cannot be tightened. A “springy” mount that twists under pressure or continues to loosen after fasteners are tightened indicates compromised decking or framing – whichever the mount is fastened to. Over time, wind and vibrations can widen fastener holes in the decking or framing, leaving screws with nothing to bite into.
- Abrasive damage or cracks more than half the thickness of the material. This is typically caused by a falling branch, hail impact, or maintenance error.
- Corroded metal deterioration with active pitting rust. A roof mount with lightly oxidized screw heads may continue to perform well, but pitting rust anywhere on the mount assembly needs to be addressed.
- Warped Metal. Minor distortion in the mounting plate can occur from wind or thermal expansion. Deformation that lifts the footplate or breaks the seal in the screw holes creates a direct pathway for water.
This article is part of our ‘Roof Component Inspection & Service Life’ Series. Learn more about:
Roof Covering
Flashing
Roof Vents
Roof Drainage