A roof replacement is a construction project. Whether you are working with Rhoden Roofing and are curious what your project will look like or a homeowner learning what to expect when your roof needs replaced, this guide walks you through each step of a typical asphalt shingle roof replacement, from the preconstruction meeting to the final cleanup.
Step 1: Preconstruction
See What Happens After a Roofing Contract Is Signed? to learn what precedes our Preconstruction process.
See How to Prepare Your Home for a Roof Replacement for a list of actions you can take to make cleanup easier and earn a hearty “Thank you” from our crews on build day.
A day or two prior to build day, your project’s foreman will call to schedule a preconstruction meeting. This can be completed either on-site or over the phone – whichever is more convenient for the homeowner, although we prefer to walk around the property with the homeowner to make sure nothing gets missed.
Preconstruction Meeting
This is your opportunity to note any additional property protection or project concerns you may have, like where you should park (typically out of the driveway) or asking how your back deck will be protected during tear-off.
If you hold a preconstruction meeting over the phone, the foreman will still visit your property to capture photos documenting your property’s condition prior to tear-off. This ensures that patio furniture, bird baths, and softscaping remains in pre-build condition when the project is complete. Any existing damages the foreman finds on the property (e.g., cracked siding, driveway stains, or damaged handrails on the porch) are relayed to the homeowner.
Tear-off is chaotic, but it’s a chaos we’re prepared for. If something is damaged, those photos help us confirm where and when it happened and make it right.
Step 2: Property Protection and Debris Management Measures
Before the first shingle comes off, we prepare your property to manage torn off debris. Our goal is to minimize the amount of debris that touches the ground and contain the debris that does.
For a detailed look at the property protection and cleanup measures we take throughout a roof replacement, see What Does Cleanup Look Like After a Roof Replacement?
Here’s what you might see on your property before tear-off begins.
Debris Collection Equipment
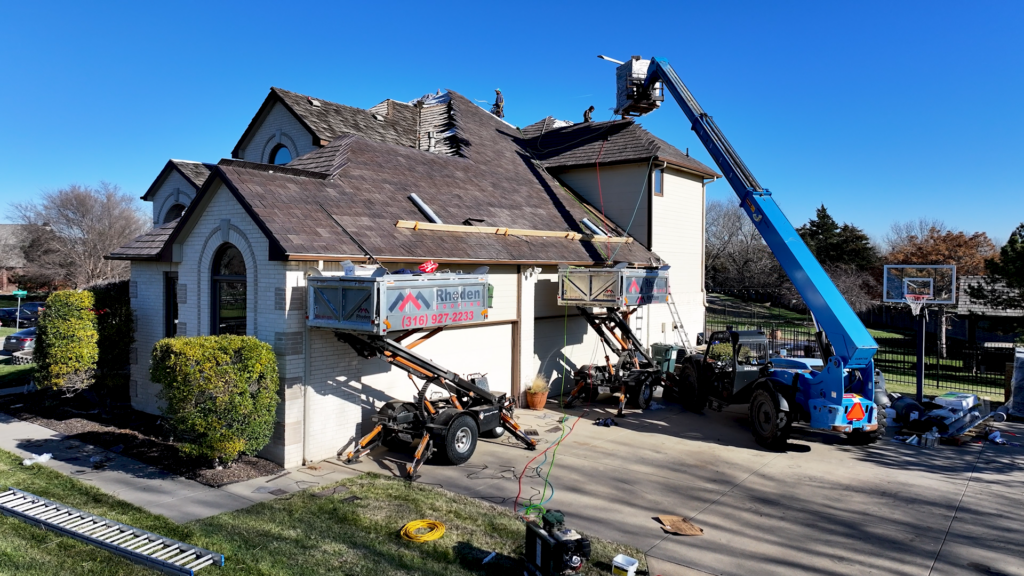
- Dump Trailer in the Driveway: If accessible, we back the primary dump trailer into the driveway. Most of the material removed during tear-off will be placed here. If the homeowner requests otherwise (e.g., the driveway was recently repaved or it’s liable to crack when supporting heavy machinery) or the driveway is inaccessible, the Equipter will be used instead.
- A Hydraulic Lift (Equipter) at the Roofline: This mobile trailer is raised to the roofline, so the crew can drop old materials straight in, keeping most debris from ever touching the ground. Its wide tires allow it to drive through the yard for properties with inaccessible driveways while minimizing ruts. The Equipter may also be used to load additional material on the roof after tear-off.
Property Protection Systems
- Breathable Catch-All Mesh: A breathable mesh netting called the Catch-All is placed around the perimeter, across mulch beds, rock beds, and decks. This catches stray material and protects landscaping. During warmer months, the Catch-All lets landscaping breath, unlike a tarp.
- OSB Panels over Vulnerable Areas: Rigid sheets of OSB are placed in front of garage doors, windows, vulnerable siding, and AC units. They deflect heavy debris during tear-off.
- Extra AC Unit Protection: Depending on the season, we typically build either a tented shield of OSB to maintain airflow or place foam/OSB directly on top of the unit. AC repairs and damage can be costly, so we prioritize keeping it safe.
Debris that doesn’t touch your yard doesn’t need to be cleaned up. Our priority is preventing debris from collecting on your property to begin with by properly preparing your property.
Step 3: Tear Off the Old Roof
Most homeowners assume their roof inspection ends when the Project Coordinator steps off the roof. That’s almost true – the system has been measured, assessed, and the new roof system can be designed. But one key layer still needs a closer look: the roof deck. All asphalt-based roof systems require a solid and nailable substrate, or decking. While Project Coordinators inspect the roof decking from the attic space, roof decking near the eaves isn’t clearly visible from the attic. Only tearing off to a clean deck reveals its condition.


When Does Tear-Off Begin?
Tear-off typically begins early. Depending on the season, it can begin as early as 7:00 am, unless the homeowner requests a later start time. Like an old-fashioned wake-up call, tear-off is usually the loudest part of the day.
How Do Roofing Crews Remove the Existing Roof?
Crews remove asphalt shingles and rooftop metals like drip edge and valley metals with a few different tools.
- Roof Forks: These are pitchfork-like tools that slide underneath the shingles and pull them and their fasteners off the roof. Roof forks can also be used to remove drip edge from the roof’s perimeter.
- Prybars: Prybars are often used to pull off edge metals and flashings. Sided chimneys often require the siding to be removed so that flashing can run vertically up the chimney, which prybars are also useful for.

Roof forks are used to tear off the majority of a roof’s surface materials. Drip edge is fabricated in 10′ sections, which can also be lifted and removed using a roof fork.

Some roof materials, including wood shake shingles and chimney flashings, require more leverage to remove. For these materials, prybars are often used for tear-off instead.
After the existing roof system is torn off, the crew and foreman assess the roof decking. This is the benefit of stripping the roof down to the deck – any rotted or out-of-code decking can be spotted. If there’s any damaged or unnailable decking, we replace it before proceeding to the next step.
Step 4: Dry-In — Protect the Deck
Once the old roof system is removed, your home is briefly exposed to the elements. Because the roof deck is not water-resistant, dry-in moves fast. Your roof is considered “dried in” when three materials are installed:
- Ice and Water Shield: Ice and water shield is a rubberized waterproof membrane that adheres directly to the roof deck. It’s installed in leak-prone areas – valleys, around penetrations (e.g., chimneys and plumbing pipes), eaves, and rakes – as a layer of redundancy. Cap nails are hammered through the membrane, which seals around the nails like a gasket.
- In our experience installing roofs on over 13,000 homes and buildings, roof penetrations are the most common source of interior leaks. That’s one of many reasons we install ice and water shield around penetrations, like chimneys.
- Synthetic Underlayment: A lightweight water shedding layer that covers the entire roof deck. It’s rolled out in horizontal strips, from one end of a slope to the other. Synthetic underlayment can withstand roughly 90 days of weather exposure if needed, which is why we typically perform emergency dry-ins using underlayment rather than tarp.
- Synthetic underlayment has only been the standard for 15 years. Before that, organic felt – better known as tar paper – was the standard. Synthetic underlayment’s improved durability, traction, and water-resistance have made organic underlayment obsolete for most reputable roofing contractors.
See Traditional “Organic” Felt vs Synthetic Underlayment for a breakdown of their key differences.
- Synthetic underlayment has only been the standard for 15 years. Before that, organic felt – better known as tar paper – was the standard. Synthetic underlayment’s improved durability, traction, and water-resistance have made organic underlayment obsolete for most reputable roofing contractors.
- Drip Edge: A pre-bent, L-shaped metal flashing that directs water away from the roof deck as it drains off the eaves and rakes. Drip edge is fastened through the underlayment to the roof deck, where it bends over the edge of the roof.
- On sloped residential roofs, drip edge typically comes in custom-fabricated 10-feet “sticks.” Each “stick” of drip edge measures 1”x2”. Larger, 2”x2” drip edge is most commonly used when OSB is laid on top of out-of-code plank decking along a roof’s perimeter.
What Does Drying a Roof in Look Like from the Ground?
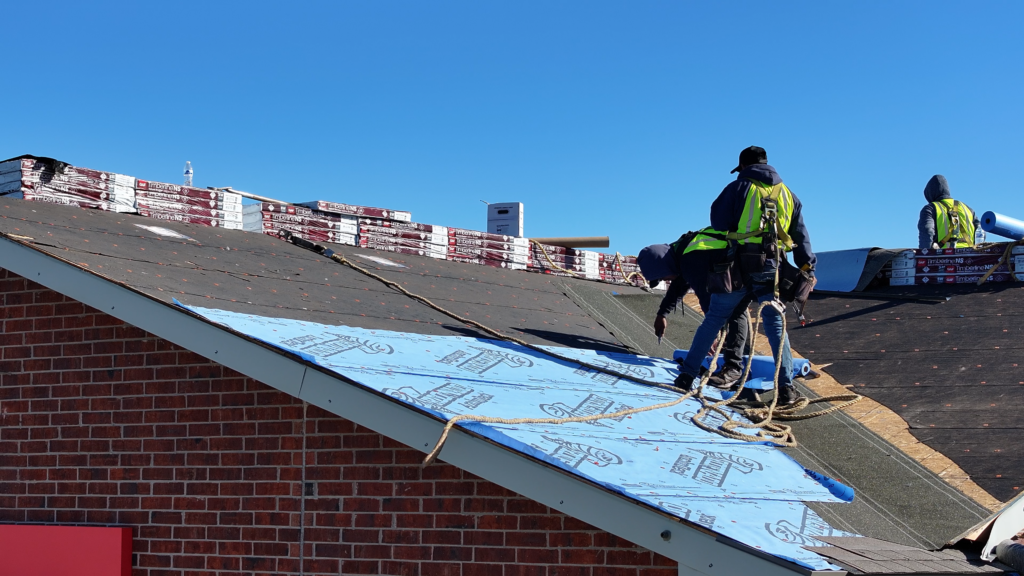
During dry-in, your roof will begin to look like a roof again, just without shingles.
- A few crew members will install ice and water shield flush to the roof deck while others begin preparing the underlayment for installation.
- GAF Feltbuster, our most-used synthetic underlayment, comes in rolls that are 250’ long and 4’ wide – enough to cover approximately 1,000 sq. ft.
The crew will cover every inch of the roof deck with these rolls, cutting them at the rakes and roof-to-wall transitions with hook blades, snips, or sharp box cutters. - If you were to get on your roof at this point – which we very strongly advise against – you would see hundreds of nails with red plastic caps at the head piercing the underlayment and ice and water shield. These caps keep the underlayment taut, which resists movement from foot traffic or wind uplift without shearing the underlayment like a standard roofing nail would.
Once dry-in is complete, the roof deck is officially protected from water, although the roof system is obviously incomplete. For a typical 2,000 sq. ft. gable roof with a 5:12 pitch, the dry-in process takes between an hour and two hours. The next step is installing the roof covering.
Step 5: Shingle Installation
Tear-off is loud and produces vibrations through the home, while dry-in involves hammering cap nails into the roof deck. Shingle installation is far more rhythmic and methodical. This is when your roof begins to look finished.

Your new shingles are roof-loaded either by the distributor or by the crew with an Equipter or Telehandler earlier in the day (note: materials delivered by the distributor, like shingles, are often roof-loaded a day or two prior to the build when the area has increased volume, such as after a hail storm.) These bundles rest along the ridge until shingle installation begins.
Before opening bundles and installing shingles, the starter course is installed at the roof’s perimeter. Often referred to as the roof’s “grip strip,” the starter course seals the roof’s perimeter against wind uplift and adds another layer of protection from water.
When shingle bundles are opened, the packaging is wadded into a tight ball and tossed either into a receptacle (i.e., the Equipter or dump trailer) or the Catch-All mesh netting below.
Where on the Roof Does Shingle Installation Start?
Shingle installation starts at the bottom edge of the roof and moves diagonally upward toward the ridge. This is called the stair-step method, which staggers seams across each course. This prevents water from infiltrating between aligned seams, as it might for a “laddered” shingle installation.
When are Metal Flashings Installed During a Roof Replacement?
As the crew progresses diagonally across the roof, they install flashings that integrate with shingle courses. Heater flue flashings, chimney flashings, and pipe boots are coursed with the shingles as they are installed. Two metals are exceptions to this:
- Counterflashing: Most common on brick chimneys, counterflashing gets installed in Step 6, after all neighboring shingles are laid.
- Valley Metal: Before shingles reach a roof valley, the crew installs metal valley flashing. This is typically installed by one or two crew members while the rest install shingle courses.
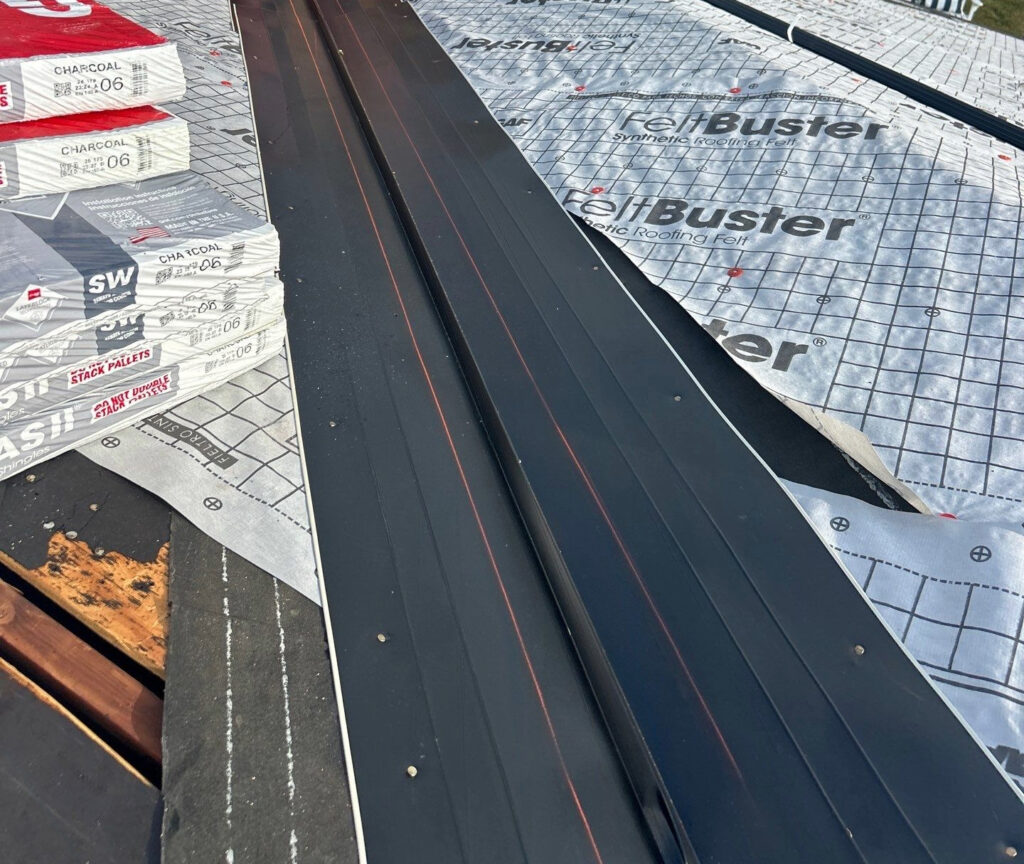
Once valley metal is in place, the crew snaps a chalk 2-3 inches away from the valley’s center on either side. This way, when the shingles reach the valley metal, they can be cut cleanly along the pre-measured line. Alternatively, a short course of shingles may be installed that overlaps the valley metal immediately after it’s installed.
See Open & Closed Valleys: How to Inspect & Evaluate Service Life to learn about best-practices for valley installation.
What Happens When Shingles Reach the Ridge?
All shingle courses stop at the ridge. If your roof includes a new ridge vent installation, a cut is made along the ridge before shingles reach it.
Step 6: Details & Cleanup
Once the final field shingle is installed, the roof replacement moves to its final stage: detailing, sealing, and cleanup.
Some crew members remain on the roof to complete the final touches, while others descend to the ground to start cleanup.
What Finishing Details Are Completed After Shingle Installation?
The following items are addressed by the crew once the final shingle course reaches the roof.
- Ridge Cap & Ridge Vent: If your roof system includes a ridge vent, the crew installs it here, followed by hip and ridge caps that complete shingle installation.
- Plugging Gable Vents: New ridge vent installations require any existing gable vents to be blocked off from inside the attic. This is typically done by the foreman using synthetic underlayment and can happen anytime during the project, depending on attic access availability.
- Counterflashing: Metal counterflashing is typically installed at this stage. Cut-in counterflashing installed over step flashings on brick chimneys require a slot to be cut at the mortar line. If a new cut is required, one crew member makes the cut while another uses a leaf blower to ensure that the resulting debris does not cling to the shingles below. Although it is most commonly installed on brick chimneys, counterflashing is also installed at roof-to-wall transitions like cornice returns.
- Beauty Bars: Where headwall flashing is used, a strip of shingles called a beauty bar is typically installed to cover the metal, helping it blend with the roofline.
- Sealing Exposed Nail Heads: Any nail heads that couldn’t be concealed, like those used to fasten central ridge caps, base flashing for the heater flue, or where dormers meet adjacent valleys, are sealed with UV-resistant sealant.
What Does Cleanup Involve?
While finishing details are completed on the roof, several crew members begin cleanup on the ground.
A detailed breakdown of post-project cleanup can be found here. Below are the key features of cleanup after a roof replacement.
- Catch-All Removal: Catch-All netting is rolled like a burrito and all debris contained in it is loaded into the dump trailer.
- Loose Debris Collected: Any remaining shingle wrappers, tar paper, or nail caps on the property are collected by hand and placed in a trash bin by a two-man team.
- Roller Magnet Pass: The crew performs a full sweep of your lawn and landscaping with a large magnet.
- Final Check-In with the Foreman: Once the roof replacement is complete, your foreman will check the work, the cleanup, and let you know it is complete. This is your chance to ask any final questions or walk around the property while the crew is on site.