Box vents (also called turtle vents, for their appearance) are the most common attic exhaust vent found on roofs today. While ridge vent systems are becoming more common on new installs (see Box Vents vs Ridge Vents), the default (and cheapest) option is box vents, which make them a roofing stable in all markets/climates.
Replacing a box vent of a roof is a fairly simple job, but attention to safety is critical. Working on a roof may require using safety gear such as an arresting harness, so be prepared before you begin.
While this article focuses on box vents used on asphalt shingle roofs, box vents are used in conjunction with many different steep-roof materials and the process is largely the same. Asphalt shingles are the most common roofing material in the United States, found on about 80% of homes.
What Is a Box Vent On a Roof?
A box vent on a roof is a way of exhausting hot air from the attic. Attic exhaust vents are positioned high up near the ridge for warm air to rise out of. Air in the attic, especially against the hot roof deckComponents - A roof deck is the structural surface connected to a building’s framing that supports the roof system installed above it. More itself, rises to the top and (hopefully) leaves out the exhaust vents, replaced by air drawn in from low intake vents, most commonly soffit vents. Exhaust vents can be static (most common) or powered, so inspect both the outside and from inside the attic to make sure that what you’re looking at is indeed a standard static box vent and not a power vent with wiring running to it.
Box vents aren’t always in the shape of a box, but some are. Some are saucer shaped, some look like ductwork or a wedge, and others combine curved and straight shapes for a particular effect. Most box vents are static, meaning they don’t require electrical power to work. Others use a 110V electric motor attached to an impeller fan, which provides about 6X the air exchange volume of a static vent of the same size.

A basic example of a standard plumbing/sewer vent termination (left) and a box vent attic exhaust vent (right). Note how all roofing materials are installed in layers starting from bottom (“drip edge”) to top (toward ridge/peak) so that water sheds on top of the row or layer beneath it.

A turbine vent is another type of exhaust vent which uses outside wind to enhance the draw of air from inside the attic, rather than static heat rise (like a box vent) or electrical power supply (power-vent). Once an iconic part of roof designs everywhere, turbine vents are mostly a historic relic among urban homes because of their habit for turning into squeaky metal sound machines. They are still manufactured, but mostly used for industrial settings or rural environments where wind is more consistent and noise or aesthetics are not a concern.
What Tools Do I Need to Replace a Box Vent?
A little planning can save you several trips up the ladder and make the process safer. The tools you will need to replace a box vent will include those to remove the old vent and reinstall the new one. You will also be working with metal flashing, which can be very sharp, and roofing materials (like shingles) that often contain fiberglass and can be a skin irritant, so gloves are recommended.
For Removing the Box Vent From the Roof:
- Flat bar for loosening the surrounding shingles and/or collar
- Nail puller or cat’s paw for removing roofing nails/tacks
- Utility knife and putty knife for loosening the old caulk or sealant
- Screwdriver for removing the box from the collar
For Disconnecting the Electrical Power on a Power-Vent:
Note: Other than the power supply, power-vents are installed and flashed just like a static box vent. We recommend having a licensed professional install any electrical components, but if you insist on doing it yourself, you will need:
- Voltage detector for verifying the electrical power is off
- Wire strippers/pliers for removing wire nuts
- Steel brush to remove oxidation on wires if not able to strip back new copper
- Electrical tape and wire nuts
What Materials Will I Need to Replace a Box Vent On a Roof?
A box vent will usually come with the collar if it uses one, any special hardware, and the box. You may need to provide the mounting fasteners (screws are best), any sealant, and butyl tape if the directions recommend it.
Here’s a partial checklist of the materials to toss in your bucket along with the tools:
● Clear Sealant, Roof Cement, Or Silicone Caulk
The box vent may come supplied with a rubberized gasket, double sided tape, HVAC tape, butyl tape, or none at all. You will need to seal underneath the mounting flange (or collar) with a tube sealant, caulk, or roof cement before installing the box.
Much like a shingle this flange will need to flex with the rest of the roof yet remain watertight. If the box vent does not come supplied with a special gasket or tape, use clear sealant designed for use on a roof. These will have UV protection, as well as superior adhesion to roof materials, such as shingles and flashing.
● General Tools
You may need some general tools or consumables, like saw/knife blades, drill bits, and knife blades, a market or pencil. In roofing, you may find that a hook blade is useful – they are razor sharp like a disposable clip blade on a utility knife, but curved. They are really useful for cutting through shingles in a single pass, or cutting underlayment and roofing membranes.
● Sheet Metal Screws or Lag Screws
If the box vent does not come with mounting screws, you will need round head or hex head sheet metal screws, lag screws, or wood screws, depending on the nature of the roof decking. When possible, use screws instead of roofing nails/tacks, as they are easier to maintain over time.
● Butyl or Other Roof Sealing Tape
Butyl and aluminum tape are commonly used to seal flanges on a roof. These are usually similar to HVAC tape in size and color, but are often made from flexible rubber. Butyl tape and aluminum tape can withstand the temperature fluctuations a roof endures without cracking, splitting, or tearing.
● Roofing Tacks vs. Screws
You can use roofing nails (tacks) to attach the flange to the roof deck if that is what you have available. Place a bead of sealant under the flange on the collar as before, but drive a roofing tack into each corner of the flange. Then cover the heads of the tacks with roofing sealant, butyl tape or silicone caulk.
Steps For Replacing a Box Vent On a Roof
The steps for installing a box vent will vary with the design, but all will typically consist of a housing, aka box, and the mounting flange.
Step 1.) Removal of the old box vent
The old box vent may have been installed using nails, screws, or adhesive. To avoid running up and down the ladder unnecessarily, take any tools you may need, as well as those you’ll definitely need, in a bucket with you. Then, instead of carrying the bucket up the ladder, they tie a rope to the handle and pull the tools up to the roof.
To begin, score any sealant or caulk surrounding the base of the collar with a sharp blade. Pros use a flat bar to gently lift up the mounting flange, which should loosen the nails. These nails can be removed with a cat’s paw or other fastener removing tools as needed.
Step 2.) Prepare the opening
If the opening in the roof deck has been damaged due to water, the surrounding opening will usually turn dark brown or black. If any of the roof decking is rotted or soft, replace it before proceeding with the box vent.
If you need to replace a section of the roof deck, find the rafters (or trusses) on either side of the damage. If you remove this entire section you’ll be able to replace the decking without repairing any rafters. Rafters and trusses are usually on 24” centers, and you should be able to find them by locating the nails holding in the section (a magnet may help if nails are covered).
Step 3.) Adjust the vent opening as needed
Standard box vent opening sizes are 8” square and 12” square, located between rafters. If the opening in the roof deck is in good condition and the same size vent is going in, no repairs will be needed. If rot is discovered, mark 6” above the damage, and 6” below the damage horizontally on the roof decking, and replace rafter-to-rafter by cutting straight lines with a circular saw set to 13/32” or 7/16” depth (standard OSB decking thickness) or whatever the decking thickness is – NOT any more, or you can cut into the rafter.
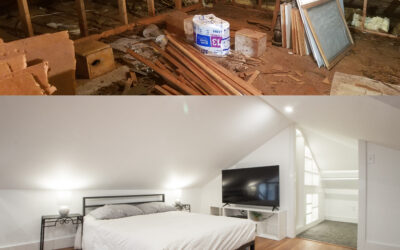
For filling in a box vent, you will have to put a structural patch over the existing hole. We like to use prefabricated patch products like Quarrix SmartPlug Roof Patch, which have a nailable flange and pre-sized piece o f OSB decking. You might need to patch in a vent hole in the event that you are moving a vent location, need less exhaust ventilation to preserve an appropriate intake/exhaust ratio, or are switching to a hot-roof system (unvented, such as in certain cathedral/vaulted ceilings, typically paired with closed-cell foam insulation on the underside of the roof deck).
What Happens If There Is a Rafter or Truss In The Way?
You may discover that a box vent has been placed over a rafter or truss instead of between them. This is possible because the box vent sits over a hole in the roof decking, not a hole in the framing. Sometimes box vents are installed there to preserve even spacing of vents and the cosmetic look from the outside. While the vent will not work as well, it’s typically not a problem, just adjust the calculation of net free area (NFA) accordingly based on how much of the actual vent opening is useful.

A SmartPlug being Installed on a Roof to Fill a Box Vent Hole. In this case, the vent is being filled as part of a complete roof replacement which includes changing the ventilation structure to a ridge vent, which explains the lack of shingles in the photo and why the vent is being filled.
Step 4.) Installing the new collar if the vent has one
Some vents may have a collar that is first attached to the roof decking, or the mounting flange may be built into the box vent housing. Most wedge shaped box vents are collarless and installed directly over the vent opening using the flange, but if yours has a collar, follow the installation directions.
Turbine vents may have a collar with a swiveling hinge, reducing the need for fittings. Much like an HVAC duct fitting, this hinge can be left as a straight fitting, or spun 90 degrees to create an elbow. Many installers turn the elbow so that the turbine is up, perpendicular with the ground. This doesn’t affect the performance, but it does look more professional.
Regardless of the design it is very important to place sealant between the mounting flange as the roof decking. This will prevent a leak from above causing water to fall through the vent.
If you are wondering why you need to seal a box vent mounting flange, but not need to seal every shingle, it’s because shingles, at least fiberglass/asphalt versions, are self-sealing. The thin plastic strip on the back of the shingle is heat activated, so the first time the roof becomes warm to melt the adhesive the shingles will seal themselves.
Step 5.) Installing the new box housing
In most situations the box vent will be static, made of vinyl or aluminum, and include its own mounting flange. These box vents simply sit over an opening in the roof, allowing hot air to naturally flow out. Where you mount the vent in relation to the shingle courses will affect how the vent looks.
The “reveal” on a shingled roof refers to how much of the shingle is “revealed” after the next course (row) is installed. This reveal is usually 5” to 5 ½”, so the mounting flange is usually about 15” to 16 ½” to align evenly with three shingle courses.
Keeping the top edge of the mounting flange aligned with the shingles, install 2 screws or roofing nails (tacks) through the mounting flange in both upper corners, then cover the flange with the upper course of shingles.
Trim the adjacent shingles to the side if needed to prevent them from butting up against the box (which can create a spot that catches water) and seal them with a ¼” bead of sealant between the shingles and the flange.
Lastly, align the bottom of the mounting flange with the corresponding course of shingles as closely as possible. Place a screw or nail in each bottom corner of the mounting flange, and seal the heads with a small blob of sealant.
Pro Tip: Align the bottom of the mounting flange with the course of shingles below
- Most static box vents are designed to provide approximately 1 square foot of vent area, so the flange is a little larger than one square foot. This allows manufacturers to size the mounting flange so that it aligns with three courses (rows) of shingles. This alignment is not critical to the vent’s performance, but it looks clean.
- Ideally, the top edge of the flange will align with the course of shingles, which should also make it align with the next two courses. The bottom edge of the mounting flange, which is usually left exposed, should align with the third course of shingles below the vent.
Step 6.) Testing the operation
After the box vent is installed and sealed you should feel air passing through the vent. The vent should have some type of screen or filter to prevent insects and debris from falling into the vent opening. Make sure these are intact and clean.
If you are replacing an existing vent, the performance should be back to where it was after you perform the repair. If the vent was added to correct a venting problem, you should notice a difference in temperature when standing inside the attic.
Back Up Plan: Replacing Box Vents
If you don’t feel like you can comfortably & safely replace a vent yourself, or discover hidden problems underneath the roofing layer, contact a reputable local roofer. If you did open up part of the roofing system and need to weather-proof the area with a temporary repair, you can see our article (including video) on How to Tarp/Temp-Repair a Roof until you’re able to move forward with the repair or get a professional onsite.
If you need roofing help in the greater Wichita area, we’re a click away. Rhoden Roofing offers free inspections and quotes on repairs and replacements.