Nails and other perforations on a roof or roof flashing are responsible for most roof leaks. One reason is because nails and other mechanical fasteners can loosen over time due to the expansion and contraction of the roof sheathing from temperature changes. Caulking over these nails is a good way to prevent this loosening, preventing a leak before it occurs.
Some roof designs, like a fully adhered flat roofing membraneMaterial - A single-ply membrane is a roof covering that uses one continuous layer of material to waterproof low-slope roofs. More, use very few, if any, fasteners that puncture the membrane. These membranes require little caulking, but any other roof design, like shingles, shakes, slate, and clay tiles can benefit from occasional inspection and sealant or nails, flashing, and perforations.
Here we will discuss how to caulk nail heads on a roof, or roof flashing, in an effective and safe way. We will discuss the need for caulk and other sealants, why they are so important, and answer frequently asked questions regarding caulking nail heads a roof.
Is Caulk and Sealant the Same Thing?
Caulk is one type of roof sealant, but others, like elastomeric polymers, have specific applications that perform better than regular caulk in certain instances. However, the most important task is to read the label, and ensure that the material is for exterior use.
Professional roofers make sure the caulk is designed for use on a roof or roof flashing. In general, the difference between cheap and good caulking is about $10 per tube, and the amount needed for repairs or periodic maintenance is only a tube or two. When in doubt, get the good stuff, as a roof leak can have extremely costly consequences. Using interior grade caulk on a roof is never recommended, as it will degrade with temperature changes and exposure to UV from the sun.
Caulk is generally considered semi-pliable after it cures, which means the caulk will flex a little, as opposed to being a rigid joint. Sealants are also flexible, but typically cure to a more pliable texture than caulk. In general, you should typically use caulk if there is little chance of the caulk needing to remain flexible, and sealant where it does, such as nail heads, and metal-to-metal flashing seams.
Where Do I Use Sealant Instead Of Caulk?
Professionals generally consider if the joint the caulk or sealant is to cover will change in size as the joint heats and cools. Roofs become very cold in winter and very hot in summer. Since most are made from plywood or OSB, these temperature fluctuations cause the roof sheathing to expand and contract, however slightly.
Small details like exposed nail heads and flashing gaps are often evaluated during routine inspections and maintenance.
Issues like this are typically addressed by a professional roofing contractor in Wichita.
Where to Use Sealant
Sealant is appropriate to cover a joint between two or more dissimilar materials, like metal flashing and a fiberglass/asphalt shingle. These materials have different expansion and contraction rates, so a flexible sealant will often last longer than a semi-flexible caulk.
Sealants tend to be manufactured with silicone or polyurethane, so many will not accept paint well. If the joint is to be painted, you should seek out a sealant that is specifically labeled paintable, as most are not.
Sealants are sometimes colored to match the roof color. Manufacturers offer color matched caulk, and even paint designed to compliment a roof design. Many metal roofs use colored sealant, as the sealant is ideal for covering nail heads and/or screws.
Where to Use Caulk
Caulk is sometimes more appropriate for covering seams and gaps between similar materials. Wherever wood trim meets more wood is a good application for caulk, because both materials will expand and contract at the same rate. The exception is metal-to-metal, because metal materials tend to have proportionately high amounts of expansion and contraction, making sealant more appropriate.
Caulk is ideal for covering nail heads because the whole point is to prevent the nail from moving. There’s usually no need for flexibility when covering a nail head, as more rigidity prevents the nail from being pushed outward.
Wood putty, or wood filler, are also commonly used for exterior home repairs as well, but not directly on roofing materials. All roof coverings, like shingles, shakes, membranes, and tiles are designed to move with the ambient temperature. Materials that dry to a non-flexible texture (like wood putty) must not be used directly on the roof material. Instead, rigid materials like putty are designed to be used on wooden trim, fascia, rake, or eaves.
Do I Need Different Caulk For Different Materials?
Usually not, as long as you are working with quality roofing sealant or exterior caulking. Logic might imply that different roof materials, like fiberglass/asphalt shingles, aluminum roll flashing, or flat roof membranes, would require a specific sealant for each one. Fortunately, most types of roof caulk and sealant are compatible with a variety of materials, including pretty much anything you’ll find on a roof.
The main compatibility issue with caulk or sealant on a roof is not about the roofing materials, but rather, compatibility of paint afterwards. If the area needs to be painted, just make sure the caulk or sealant is specifically labeled as paintable.
The only other specific recommendation we have is related to flat roofing, where silicone-based (or 100% silicone) is often recommended, as silicone bonds well to smooth surfaces like the surface membranes used in flat roofing.
Water Based Caulk
Water based caulk, usually labeled as latex or acrylic caulk, are named so because until they cure the material will dissolve in water. Once the caulk cures, the bead remains semi-flexible, but never completely hard.
Water based caulk offers faster curing than solvent based caulk, as well as water clean up, and no VOCs. Water based caulk usually has a shorter lifespan than solvent based caulk, so maintenance is a bit higher. However, water based caulk is often paintable, while many times solvent based caulk is not.
Solvent Based Caulk
Solvent-based caulk and sealants are manufactured with a base such as silicone, butyl rubber, and polyurethane. These tend to have higher UV resistance and overall durability, but are more difficult to work with, clean up, and more likely to have chemical incompatibility such as being un-paintable. Just be sure to read the whole label before putting anything on your roof.
How Do I Locate a Hard-to-Find Nail Pop On a Roof?
If you can’t see a nail pop, but the roof is leaking:
Often, the easiest way to find a tiny nail pop in a roof is from the inside. As long as it can be done safely, you may be able to climb into the attic space during the day, and inspect the roof sheathing from underneath. This method works best during daytime, as any tiny speck of daylight will be visible from inside a dark attic.
Another method is to inspect the outside of the roof after sunset, but before total darkness. Working on a roof in the dark can be extra dangerous, so dusk is a safer time to make an inspection like this. To find a nail that has not been completely pushed out of its hole, the goal is to find anything on the roof that sticks up tall enough to create a shadow. Shine a flashlight as perpendicular to the roof surface as closely as possible. If a nail is sticking up, it will cast a long shadow on the roof, making it easy to locate.
Only use this method when you have a helper available, even if the helper is only watching. Accidents that happen at night can go unreported for hours, so it’s best to have a helper in case of an accident.
Which Mark to Use When Cutting the Top of a Caulking Tube
You may notice that the tip of the caulk tube has diagonal markings, which indicate the circumference of the bead. Most caulk and sealant tubes are marked at 1/16”, ⅛”, ¼” (the most commonly used in roofing), and ½”.
The mark is set on a slant so that the bead will exit the tube more consistently. Caulk isn’t applied at a 90 degree angle to the surface, but rather at ~45 degrees, resulting in a smoother bead. Use a utility knife to cut the preferred bead, and then perforate the seal on the tube – usually by poking a nail into the hole, or using the perforation spike found on the bottom of many caulking guns.
To seal a partially-used tube, you can use an electrical wire nut to screw on in place of a cap. If the bead is ⅛” to 3/16”, often a yellow wire nut is the perfect size to use as a cap. If the tip size is ¼” to ⅜”, a red wire nut will often do the trick. If the bead size is ½” or larger, the tube will probably be used in its entirety, so a cap is rarely needed.
Step-By Step: How to Caulk Nail Heads On a Roof Or Roof Flashing
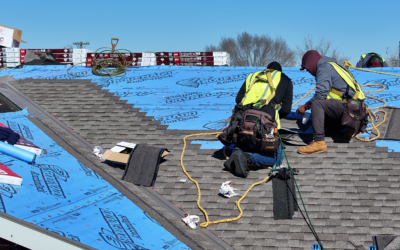
Caulking nails on a roof is not a complex task, but it can be a dangerous one. Never attempt to walk on a roof unless you’re completely comfortable, wearing the appropriate safety gear, and can take your time.
Choose the Caulking Product
The single most important decision to be made is to select the correct caulk for the job. Never use interior grade caulk or sealant outdoors. These do not contain UV protection, and are more likely to detach from both metal and shingles.
Only use exterior grade caulk or sealant, and only as directed. Some take up to a week to fully cure, so plan accordingly when shopping. Solvent based caulks take longer to cure than latex based. If you plan to caulk and paint a joint in the same weekend, latex will be a better option.
Make sure the caulk you select is paintable if you plan to paint the joint. Latex paint will not adhere well to 100% silicone unless the caulk was designed to accept it. If the trim around siding or flashing are different colors, professionals will often use a clear caulk instead of a colored one, as this avoids the need to touch up the paint and preserves the change in color.
Clean the Area
Remove any dust, mold, grime, or debris from the nail heads to be caulked. If the old caulk comes away with the debris, minor damage may have already occurred. Probe any suspected soft wood with a screwdriver, and repair any wood rot before continuing with caulk.
Secure Loose Nails
Caulk is not there to prevent a nail from backing out, but rather to seal the tiny space between the nail and the nail hole. Any loose fasteners must be properly secured before caulking, as the tensile strength of the caulk is not strong enough to resist a nail pop.
Carefully Apply the Caulk Using a Caulk Gun or Putty Knife
Caulk and sealant should be applied using a caulk gun when possible, and this controls the size of the bead produced. Large blobs of caulk can catch debris or hold water if they are large/lumpy enough, (plus look unsightly), so in general, limit the total thickness to the width of individual beads.
Pay attention to the directions for the caulk or sealant itself, such as applying it in appropriate temperature conditions, on a dry surface, and no thicker than recommended. Caulk tubes often have indicator marks along the tip to measure the recommended bead size, which will also be among the directions on the tube.
Stay Safe
If you are uncomfortable performing work on a roof, or unable to locate a leak source, work with a reputable local contractor. As always, if you’re in the greater Wichita area, we’re happy to help. Rhoden Roofing offers free inspections for repairs and preventative maintenance, which we call Roof Tune-ups.
Will Caulk Dissolve After It Has Cured?
No, caulk will not dissolve after it has cured, whether the caulk is water based, or solvent based. Neither can be removed with water or solvent after the bead has lost its moisture content. In the case of water based caulk, the water evaporates, while in the case of solvent based caulk the solvent evaporates.
Neither water, nor solvent based caulk can be rehydrated after it cures. If either caulk begins to fail physical removal is required before a repair can be made. To remove, use a scraper or other flat, sharp tool to remove loose caulk, as the new caulk will not soften the old caulk and allow it to re-bond with the surface, so it should be removed entirely.
Cleanup During Install: Using Acetone Or Other Solvent
When working with solvent based caulk (which is most of the time) it’s usually best to keep a solvent, like acetone, available for cleanup. Clean the area around the repair, avoid getting any on tools, and be careful to avoid skin contact.
Acetone and other solvents are harmful to skin, so wear gloves to limit exposure. Solvents also emit volatile organic compounds, aka, VOCs, which are the fumes. These fumes must be managed carefully by ensuring proper air circulation (therefore usually not a concern in outdoor environments unless doing major sealant work, e.g. patch work on a flat roof. In those cases, the use of an approved respirator is recommended or required by safety regulation, depending on the material.
These solvents are typically very flammable as well, so the VOCs must not be allowed to accumulate, such as inside an attic space. Acetone and other solvents are available in low VOC versions, but these are often more expensive than standard solvents. For this reason, no open flames or sources of heat should be near a solvent based caulk until the caulk has completely cured.

Two nails were left exposed on this piece of ridge cap shingle. While the one on the left held out water, the one pictured on the right ended up being the cause of problems for this home and the reason we were called out. Possibly because of prevailing winds moving rain/water differently, or expansion/contraction loosening the nail over time, or simply bad luck – this nail let water through into the attic. Thankfully an easy fix, and caught early.
Typically, ridge cap shingles are installed with the overlap of the next shingle covering the nails of the previous one. When installed that way, only the very last ridge cap shingle is left with exposed nail heads, which need to be sealed over. Perhaps this was a repair or a DIY job that these nails were left exposed (and also un-sealed) in the first place.

This older asphalt shingle roof has a few problems: including granule loss and some damage from impacts visible (presumably hail). Additionally, the exposed nail peeking out in the middle of the field shingles is an installation issue and a potential leak source. This “low nail” was put in below the dedicated nail line/nail zone of the shingle, leaving it too low to be covered up by the row above. The proper fix is to replace the shingle, but that’s not always possible or practical, and often caulking the nail is sufficient to add some extra protection if this problem is discovered later.
A proper installation will not leave any nails visible in the field (main area) of the roof. All shingles have a nail line or nail zone specified on their installation guide, and marked on the shingle itself for ease of installation. Combined with a specified overlap for each course (row) of shingles, and installed from the bottom edge of the roof upward, this means that overlapping shingles cover all of the nails below.
Is Caulking Nail Heads On a Roof Important?
Most professional roofing companies will tell you that a lack of maintenance is the most common cause of roof leaks. This maintenance includes re-caulking any nail heads that have been exposed over time. Thankfully, it’s just about the easiest and cheapest maintenance you can perform on a roof.
The nails themselves should be corrosion resistant, so rust is not the typical concern. The hole made in the roof by the nail is of much greater concern. If the nail pops out completely, water will infiltrate the hole, however small.
Can I Caulk the Nail Heads On a (Low Slope) Flat Roof?
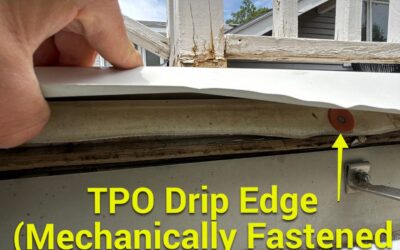
You can caulk or seal nail heads on a low slope roofRoof Types - Low-slope roofs (flat roofs) are a type of roof system with less than a 3:12 pitch, most commonly found on commercial and industrial buildings. More, also known as a flat roof. Flat roofs are designed to avoid placing mechanical fasteners in a low area that could flood in a heavy rain. However, vents and other roof penetrations can make sealing nail heads a must, such as around a weatherhead or plumbing vent.
Can I Caulk the Nail Heads On a Sloped Roof (Field)?
You can caulk the nail heads on a sloped roof, but thanks to layered install starting from the bottom up, there won’t be many exposed. Most of the exposed nails on a sloped roof will be located around the flashing. Roofs commonly employ step flashing around chimneys and dormer windows, and roll flashing around the roof perimeter.
By design these areas will have at least a couple of exposed nails, such as at one end of the ridge, or along the upper side of penetration flashings, which require caulking or sealing to prevent a leak around the nail head. If the roof is made from metal roofing panels, each screw will have a rubber grommet to seal around the screw.