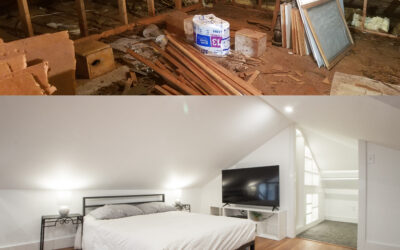
Whether you are buying a building, or evaluating the condition of your existing roof, it’s worth understanding common failure points of flat roofing systems to be able to make informed decisions about maintenance, budgeting, or the potential need for repairs. We have assembled a resource on what our team finds to be the most common failure points and leak sites for low-slope roofs Roof Types - Low-slope roofs (flat roofs) are a ty... More, which works as a checklist for inspection items in evaluating your property’s roofing system.
We find that roof inspections fall into one of two categories: 1) condition assessment, or 2) diagnostic. Hopefully, you’re in the first category – evaluating the condition of a working roof system. However, this resource is also a starting point for figuring out the next steps if you have an active leak and are trying to identify, or diagnose, the source.
How do Commercial Roofs Fail?
We collected our own team’s experience by discussing specific causes of failure points across hundreds of flat roofing systems over the years. When we define “failure points” – we’re talking about water intrusion – as the purpose of a roofing system is to keep outside elements outside. This list is not comprehensive, but categorizes the most common problems. This also includes failure points that can be fixed by repairs as well as total system failures that require full replacement or complete re-covering.
- Open seams or flashings
- Drainage failures (slope changes, cracking, or debris clogging)
- UV radiation and material deterioration
- Wind uplift
 Wind uplift is the upward force exerted on a roof ... More damage
 - Ice and snow damage
- Hail strikes
- Falling tree limbs
- Critter damage (termites, raccoons, birds, mice, etc.)
- Human-generated Punctures (often caused by technicians dropping tools, screws, or heavy equipment)
We’ve come up with a mini series that works as an inspection guide for commercial and low-slope roofsRoof Types - Low-slope roofs (flat roofs) are a ty... More, split into three categories by problem source:
- Part 1: Improper installation (improper flashing, seam welding, and lack of pipe boots)
- Part 2: Poor quality roofing materials and how they respond to hazards on low slope roofs
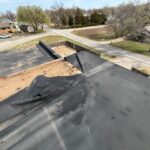
- Part 3: Poor drainage design that leads to ponding water
This article (Part 1) will focus on the ramifications of improper installation of flashing materials and seam welding technique.
Part 1 – Improper Installation of Roofing Materials:
Where on my Roof Are Leaks Most Likely to Occur?
The majority of roof leaks occur at roofing material seams and at junction points where objects penetrate the roof’s surface. Roofers use flashing to waterproof and seal these critical junctions and transitions where different materials, surfaces, and roof angles meet.

What Is Flashing and Why Is it Important?
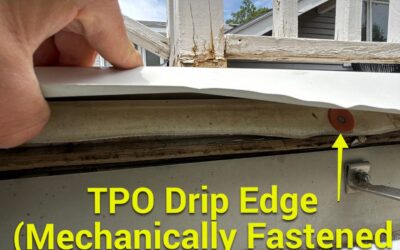
Flashing refers to any thin, small piece of waterproof material that is used to prevent water penetration into a structure. There are a multitude of different types of flashing. In commercial roofing, flashings can be made of metal, TPO Material - TPO (thermoplastic polyolefin) is a whi... More, PVC, modified bitumen, or specialty polymers designed to add extra layers of durability and protection. Improperly installed or missing flashings are the leading cause of leaks and water damage on commercial flat and low slope buildings.
Flashing Around Roof Penetrations: If your roof is leaking, it’s likely caused by improper flashing around roof penetrations, such as curbs, vents, and pipe inlets and outlets. Sealing around these penetrations takes a lot of time, skill, and craftsmanship – and is therefore a common site for installation issues if work is performed by general building maintenance rather than a specialty low-slope roofer.
Curbing: A curb is any type of elevated platform or frame that supports rooftop equipment, such as HVAC units, exhaust vents, skylights, etc. Curbs are typically made of metal, wood, or some combination of the two. If your commercial roof is covered with TPOMaterial - TPO (thermoplastic polyolefin) is a whi... More, skilled roofers will first make sure that the TPOMaterial - TPO (thermoplastic polyolefin) is a whi... More membrane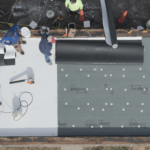 Material - A single-ply membrane is a roof coverin... More is secured around the curb with fasteners like metal plates and long screws. Then they will fabricate a custom TPO curb cover to protect the curb from water damage, and carefully heat weld the TPOMaterial - TPO (thermoplastic polyolefin) is a whi... More membraneMaterial - A single-ply membrane is a roof coverin... More into place. Then they will apply T-joint patches, which are small pieces of TPOMaterial - TPO (thermoplastic polyolefin) is a whi... More, anywhere that 3 layers of membraneMaterial - A single-ply membrane is a roof coverin... More come together to form a T. Strategically applied T-joint patches help to prevent leaks at vulnerable points. The proper application of T-joint patches is essential for passing the manufacturer’s inspection that is required for a 20+ year warranty.

Pipe and Vent Penetrations: All pipe and vent penetrations must be properly flashed with either pre-molded pipe boots or custom-fabricated waterproof membraneMaterial - A single-ply membrane is a roof coverin... More wraps. A molded pipe boot is a traffic cone-shaped cover that’s designed to slide over a cylindrical pipe penetration and provide a waterproof barrier all the way around it. Pipe boots are typically made from semi-rigid, durable elastomeric material such as rubber, vinyl, TPOMaterial - TPO (thermoplastic polyolefin) is a whi... More, or PVC. If your commercial roof is covered with TPOMaterial - TPO (thermoplastic polyolefin) is a whi... More, for example, all of your pipe boots should also be made of TPOMaterial - TPO (thermoplastic polyolefin) is a whi... More, so that the materials bond together easily. The term “elastomeric” refers to the fact that the pipe boot will have a kind of rubbery, elastic feel to it. These elastic properties will allow the pipe boot to withstand any hail strikes or accidental kicks from workers. We find that pipe boots are sometimes missing on roofs – either because of a lack of experience by the original installation team, or possibly as a hope to save costs. However, pipe boots are not expensive: leaks are.
Why Is Proper Seam Welding Important?
Material Seams: Most flat and low slope commercial roofs installed in the last 30 years are protected with a waterproofing membraneMaterial - A single-ply membrane is a roof coverin... More such as TPO, PVC, or modified bitumen. Making sure the seams of these membranes are securely welded (or adhered) together is critical because the membraneMaterial - A single-ply membrane is a roof coverin... More is the primary barrier responsible for keeping water and humidity out of your building. These 3 types of membranes come in rolls of various widths depending on the material and the size of the area to be covered. Modified bitumen typically comes in 3-foot wide rolls, while TPOMaterial - TPO (thermoplastic polyolefin) is a whi... More and PVC typically come in 12-foot wide rolls. Each of these 3 materials requires that material-specific products and techniques be used to seal and waterproof their seams. Put another way, you cannot use the same techniques to weld the seams of a PVC roof as you would for a TPOMaterial - TPO (thermoplastic polyolefin) is a whi... More roof.

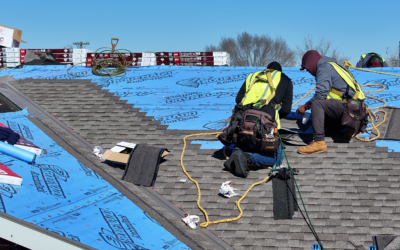
- TPOMaterial - TPO (thermoplastic polyolefin) is a whi... More Seams: In our region (lower Midwest), TPO is the most popular single-ply waterproofing membraneMaterial - A single-ply membrane is a roof coverin... More used on commercial roofs today. While older roofs of different styles can be maintained at good condition and perfectly adequate, most newer roofs are TPOMaterial - TPO (thermoplastic polyolefin) is a whi... More. When roofers install TPOMaterial - TPO (thermoplastic polyolefin) is a whi... More on your roof, they use what is known as a “robot welder” to heat weld the 12-foot wide sheets together. Heat welding involves using hot air to heat up and soften the TPOMaterial - TPO (thermoplastic polyolefin) is a whi... More membraneMaterial - A single-ply membrane is a roof coverin... More. Once heated, the overlapping pieces can then be bonded together, as workers apply pressure and go over the seams with weighted rollers. Roofers also use handheld heat guns to weld small patches to critical areas within 6” of a transition, like a curb or perimeter wall, that need an extra layer of protection. The bonds that are created at the TPOMaterial - TPO (thermoplastic polyolefin) is a whi... More seams are long-lasting if sealed correctly.
- PVC Seams: PVC seams must be heat welded at a higher temperature than TPOMaterial - TPO (thermoplastic polyolefin) is a whi... More seams. However, we’re not convinced that all roofers are aware of that, because we get frequent calls about split PVC seams that are under-bonded from installation issues. A fair amount of skill goes into determining the right welding temperature based on the weather conditions and ambient temperature. A skilled roofer will start with a lower temperature and gradually increase in increments of about 100°F to find the optimal welding temp. Failure to weld the PVC seams at the right temperature will eventually result in roof leaks. This is why it is so important to choose an experienced roofing contractor who works with a well-trained workforce.

- Modified Bitumen Seams: Properly sealed seams are critical for preventing leaks with modified bitumen (mod bit) because this roofing membraneMaterial - A single-ply membrane is a roof coverin... More typically comes in 3-foot-wide rolls. Mod bit’s rolls are roughly one-third as wide as single-ply membraneMaterial - A single-ply membrane is a roof coverin... More rolls for TPOMaterial - TPO (thermoplastic polyolefin) is a whi... More or PVC, resulting in more seams per square foot. More seams means more potential entry points for water and moisture if the seams start to break down. Modified bitumen seams are sealed in different ways depending upon whether you are using the cold-applied or torched-down mod-bit. For more information about modified bitumen application methods, please see our recent article on Fleeceback TPO vs Modified Bitumen.
- Welding Temperature: This is where the skill level of your roofing contractor becomes critical. The temperature of the robot welder is not a set-it-and-forget-it deal. A skilled and experienced roofer will know which temperature to set the robot welder to during the hottest and coldest days of the year. If it’s chilly this fall, an experienced roofer will know they need to increase the temperature on the robot welder to ensure that the TPOMaterial - TPO (thermoplastic polyolefin) is a whi... More membraneMaterial - A single-ply membrane is a roof coverin... More gets hot enough to create the strongest bond possible. If the temperature is too cool, the weld will not properly seal the seams. These cold welds can lead to roof leaks down the road.
When choosing a roofing contractor to perform yearly maintenance, you will want to choose one that has years of experience evaluating, installing, and maintaining commercial flat and low slope roofs. An experienced roofing contractor will know exactly what to look for when checking for potential leaks and weak points in your roofing system.
Summary and Key Takeaways:
- 3 Common Causes of Leaks: This series of articles covers the 3 most common causes of premature roof failure. This article (Part 1) focuses on the ramifications of proper and improper installation of roofing materials. Click on the links provided to learn more.
1) Improper installation
- Roofer’s Level of Expertise: A great deal of skill, knowledge, and craftsmanship goes into properly flashing and seam welding on a commercial roof to ensure that it does not leak for upwards of 20 years.
- Proper Flashing and Seam Welding: The majority of roof leaks occur at roofing material seams and at junction points where objects penetrate the roof’s surface. Properly flashing roof penetrations is critical to ensuring your building stays dry for many years to come.
- Beware of Cut-Rate Bids: Low-budget roofers are able to cut corners and offer lower bids because they do not take the time to properly flash and seam weld your roof. Yes, they might be able to cover your roof for less upfront cost, but you will likely end up paying more in the long run. Choosing a knowledgeable and reputable roofing contractor today will save you time, money, and headaches in the long run.
This article is part of our ‘Low Slope and Commercial Materials’ Series. Learn more about:
System Types and Surface Materials
-
- TPO vs EPDM
- TPO vs PVC
- Fleeceback vs. Standard Membranes for Low-Slope Roofs
- Mechanically Attached vs Fully Adhered Roofing Systems
- Black Roofs vs White Roofs
- Is a Metal Roof Right for My Commercial Property?
- Can a Commercial Roof Coating Save Me Money
- Flat Roof Coatings – What Are They and When Are They Appropriate?
- 3 Best Commercial Roofs in Wichita, KS
- What Is a Flute-fill Retrofit on a Commercial Metal Roof and When Does It Make Sense?
- Retrofit vs. Replacement: What’s the Best Option for Your Commercial Metal Roof?
- Fleeceback vs. Standard Membranes for Low-Slope Roofs
Substrate Systems
-
- Polyiso Insulation vs EPS Insulation
- What Do I Need to Know About Tapered Roofing Insulation Panels?
- What Is Cover Board and When Does it Make Sense to Include in a Low-Slope Roofing System?
- DensDeck vs Fiberboard: Which Cover Board Is Best for Low Slope Roofs?
- Commercial Roof Decking Guide: Comparing Wood, Metal, & Concrete for Low-Slope Roofs